How to Use This Page
This page helps you follow the puzzle path, get help when needed, and reset each puzzle when you are done.
View Puzzle Flow
Click any symbol or box to jump directly to that puzzle.
START
To open the lock labeled START, first read the script below or watch the video.
Number of yellow words + number of yellow letters = CODE
Script
We All Have a PROBLEM
For all have SINned
and fall short of the glory of God (Romans 3:23)
Is there a SOLUTION?
But God shows his love for us in that while we were still sinners,
CHRIST DIED for us. (Romans 5:8)
Do I have an OPTION?
YES!
God gave us FREE WILL
to choose our PATH
REJECT the solution, continue in darkness
and spend an eternity apart from God.
OR
ACCEPT the solution that
JESUS DIED for your sins
AND ROSE from the dead 3 days later
and walk in the light.
085
See Step-by-Step Instructions
Quick Explanation
Count all highlighted yellow words and the total number of yellow letters within those words. Add the two totals together to get the final code: 085
Full Step-by-Step Walkthrough
Puzzle Goal:
Open the START lock by determining the correct 3-digit code from the script.
What You Need:
- The START script with highlighted yellow words
Where to Look:
- The SCRIPT section of the manual
What to Look For:
- All words highlighted in yellow
- The number of yellow letters in each highlighted word
How to Interpret It:
- There are 14 highlighted yellow words.
- Those highlighted words contain 71 total letters.
- 14 + 71 = 085.
Step-by-Step Solve Instructions:
- Read through the script and identify all highlighted yellow words.
- Count the highlighted yellow words. There are 14.
- Count the yellow letters within those highlighted words. There are 71.
- Add the two totals together: 14 + 71 = 085.
- Set the lock to 0–8–5.
- Align the numbers from top to bottom with the arrows.
- Pull down on the lock body to release the shackle.
- Remove the lock to access the Fish puzzle.
Final Answer:
085
What Opens / What You Get:
The START lock opens, giving access to the Fish puzzle.
Reset This Puzzle
This puzzle resets as part of the Fish puzzle.
View Fish Puzzle Reset Instructions

Need a Hint?
Start with Clue 1 and only move forward if needed.
Clue 1
Lift and twist gently, never force it. Favor right turns until you reach the thick divider, then the path will shift.
Clue 2
Moving back to the start can help. Look from the bottom at eye level to see the path.
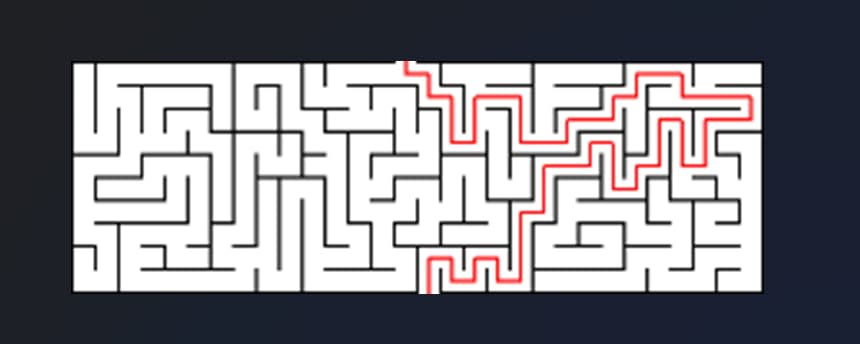
See Step-by-Step Instructions
Quick Explanation
After the START lock has been opened using 085, follow the maze path shown in the solution image above to release the Fish puzzle cover.
Full Step-by-Step Walkthrough
Puzzle Goal:
Solve the Fish maze, remove the cover, and retrieve the verses inside.
What You Need:
- The Fish puzzle
- The path shown in the solution image above
Where to Look:
- The maze path inside the Fish puzzle cover
- The red cross on the Fish puzzle
What to Look For:
- The START point at the bottom of the solution image
- The large divider wall in the maze path
- The groove that leads upward toward the release point
How to Interpret It:
- The solution image shows the correct maze path.
- Begin from the START point at the bottom of the image.
- Use small, controlled movements and do not force the cover.
Step-by-Step Solve Instructions:
- Open the START lock using 085.
- Position the puzzle so the red cross is facing you.
- Begin with a slight upward motion to engage the maze.
- Move right, then down.
- Continue right using small, controlled movements.
- When you reach the large divider wall, begin moving back left.
- Use small adjustments until you find the groove that leads upward.
- Follow the path all the way to the top to release the cover.
- Remove the cover and set it aside.
- Remove all twelve verses from the base: six red and six black.
Final Answer:
Follow the path shown in the solution image above.
What Opens / What You Get:
The Fish puzzle opens, revealing twelve unique verses used later in the game.
Reset This Puzzle
Text Reset Instructions
Goal:
Reset the Fish puzzle so it is fully assembled, aligned, and locked for the next group.
Materials:
- Fish puzzle cover
- Maze base
- Verse cards
- START lock
Steps:
- Gather the pieces: fish puzzle cover, maze base, verse cards, and START lock.
- Insert the verse cards into the maze base, making sure they are fully seated.
- Place the cover onto the base, aligning the dot behind the cross with the entry slot.
- Move the cover through the maze in reverse, following the solution path until the cover is fully seated and the cross is properly aligned.
- Confirm the cross is aligned and the padlock holes on the back line up correctly.
- Hold the puzzle upside down and insert the lock shackle from the base side up toward the cover so the START symbol faces outward and upward when locked.
- Press the shackle down to secure the lock. If it does not close, set the correct combination aligned with the indicator arrows and try again.
- Spin the dials to confirm the lock is properly set. If the dials do not spin, press the shackle down again and verify alignment.
Reset Video
 has been solved.
Need a Hint?
Start with Clue 1 and only move forward if needed.
Clue 1
You’ve found verses, yet more remains. Can you recognize the symbols?
Clue 2
The symbols in the cover represent the days of creation. Arrange them as God created, starting from the beginning.

See Step-by-Step Instructions
Quick Explanation
Use the puzzle cover and the Genesis creation frame to match each creation day with its symbol. Place all seven pieces in order from bottom to top, then pull the drawer open.
Final answer: See the solution image above.
Full Step-by-Step Walkthrough
Puzzle Goal:
Open the Bible puzzle by placing all seven locking bars in the correct order.
What You Need:
- The Bible puzzle
- The puzzle cover
- The Genesis creation frame
Where to Look:
- Look inside the puzzle cover.
- Read the Genesis creation story on the frame.
What to Look For:
- The seven symbols inside the cover
- The day of creation paired with each symbol
- The correct order of the seven days of creation
How to Interpret It:
- Each symbol matches one day of creation.
- Use the Genesis frame to identify the correct order:
- Day 1: Day & Night
- Day 2: Heavens & Oceans
- Day 3: Land, Plants, & Trees
- Day 4: Sun, Moon, & Stars
- Day 5: Fish & Birds
- Day 6: Man & Animals
- Day 7: Rest
- Match each creation day to the correct symbol using the puzzle cover.
- The pieces must be placed from bottom to top in Day 1 through Day 7 order.
Step-by-Step Solve Instructions:
- Gather the Bible puzzle, the Fish puzzle cover, and the Genesis creation frame.
- Read through the Genesis creation story.
- Determine the correct order of the creation days.
- Match each day to its corresponding symbol:
- Day 1: Day & Night
- Day 2: Heavens & Oceans
- Day 3: Land, Plants, & Trees
- Day 4: Sun, Moon, & Stars
- Day 5: Fish & Birds
- Day 6: Man & Animals
- Day 7: Rest
- Place the seven pieces in order from bottom to top.
- Once all seven pieces are placed correctly, pull the drawer open.
Final Answer:
See the solution image above.
What Opens / What You Get:
Two magnifying glasses.
Reset This Puzzle
Text Reset Instructions
Goal:
Reset the Bible puzzle so it is locked and ready for the next group.
Materials:
- Bible puzzle lid
- Red drawer
- Two magnifying glasses
Steps:
- Gather the Bible puzzle lid, the red drawer, and the two magnifying glasses.
- Insert the two magnifying glasses into the drawer, one in each slot. Their orientation does not matter.
- Make sure the puzzle is set to the correct combination. If it is not, the drawer will not slide in properly.
- Carefully align the three rails on the drawer with the matching rails on the lid. It may help to start by aligning one rail slightly, then guide the others into place.
- Slide the drawer fully into the puzzle until it is completely seated.
- Move all sliding rails to the far left to secure the puzzle for storage.
Reset Video
 puzzle has been solved.
Need a Hint?
Start with Clue 1 and only move forward if needed.
Clue 1
Do you see “No One” written anywhere else? Hint: There are two other places.
Clue 2
Look closely at the verses on the black side.
146
See Step-by-Step Instructions
Quick Explanation
Look at the Cross puzzle and find the repeated words “No One.” Then locate the verse card that contains those same words. The only verse that includes “No One” is John 14:6, which gives the lock code 146.
Full Step-by-Step Walkthrough
Puzzle Goal:
Find the correct Bible verse and use it to determine the lock combination.
What You Need:
- Cross puzzle
- Verse cards
Where to Look:
- The top of the Cross puzzle
- The verse cards on the black side
What to Look For:
- The repeated words “No One” on the Cross puzzle
- A verse card that contains those same words
How to Interpret It:
- Match the repeated phrase “No One” to the correct verse.
- The only verse that includes “No One” is John 14:6.
- Use the verse reference as the lock code: 146.
Step-by-Step Solve Instructions:
- Gather the verse cards and the Cross puzzle.
- Look at the top of the Cross puzzle and find the repeated words “No One.”
- Search the verse cards for a verse containing those same words.
- Identify John 14:6 as the only matching verse.
- Use the verse reference to determine the code: 146.
- Align the numbers from top to bottom with the arrows on the lock.
- Pull down to release the shackle, then remove the padlock and set it aside.
- Open the cover.
- Remove the cipher wheel from inside.
Final Answer:
146
What Opens / What You Get:
The Cross puzzle opens, revealing the cipher wheel.
Reset This Puzzle
Text Reset Instructions
Goal:
Reset the Cross puzzle so it is locked and ready for the next group.
Materials:
- Cross puzzle cover
- Cipher wheel
- Cross lock
Steps:
- Gather the pieces.
Gather the cross puzzle cover, the cipher wheel, and the cross lock. - Insert the cipher wheel.
Place the cipher wheel inside the cover with the logo facing upward. Make sure the top of the cover, labeled “No One,” is also facing upward. - Close the cover.
Close the cover over the cipher wheel. It should fit easily. If it does not, compress the wheel slightly and try again. - Attach the lock.
Place the lock onto the puzzle with the cross facing upward so the arrows are visible. - Set the correct combination.
Set the lock to the correct combination, making sure the numbers are aligned with the indicator arrows. - Lock the puzzle.
Press the shackle down to secure the lock in place. - Check the lock.
Spin the dials to confirm the lock is properly set. If the dials do not spin, press the shackle down again and ensure the correct combination is aligned with the arrows.
Reset Video
 puzzle has been solved.
Need a Hint?
Start with Clue 1 and only move forward if needed.
Clue 1
A proper decoding of the scrambled words, on the back of the wheel, reveals an English sentence.
Clue 2
Align the “D” on the large wheel (white lines) with the “A” on the small wheel (red lines). The white letters will reveal your answer.
See Step-by-Step Instructions
Quick Explanation
Use the cipher wheel from the Cross puzzle to decode the red letters found on the bottom of the Cross puzzle. Only the fully capitalized words need to be decoded. The decoded message points you to a clock time. Use the carrying case base and the verses from the Fish puzzle to find the correct verse. The answer comes from Romans 6:23 and is WAGES.
Full Step-by-Step Walkthrough
Puzzle Goal:
Open the Heart puzzle by decoding the correct final word.
What You Need:
- The cipher wheel from the Cross puzzle.
- The verses from the Fish puzzle.
- The carrying case base.
Where to Look:
- Look at the bottom of the Cross puzzle for the red coded letters.
- Use the carrying case base to identify the clock time.
- Check the Romans verse from the Fish puzzle verses that matches that clock time.
What to Look For:
- Two cipher wheels: one with red letters and one with white letters.
- Alignment marks / white guide lines used to line the wheels up correctly.
- Fully capitalized red coded words on the bottom of the Cross puzzle.
- The Romans verse that matches a clock time.
- The correct five-letter answer word in Romans 6:23.
How to Interpret It:
- Align the cipher wheel correctly using the guide marks.
- The red wheel letters are the coded letters.
- The white wheel letters are the decoded letters.
- Only the fully capitalized words need to be decoded.
- Decode the red-letter message at the bottom of the Cross puzzle.
- The decoded message points to a clock time.
- Use the carrying case base and the verses from the Fish puzzle to match that clock time to Romans 6:23.
- The correct five-letter answer from that verse is WAGES.
Step-by-Step Solve Instructions:
- Open the Cross puzzle and locate the cipher wheel inside.
- Identify the two letter wheels: one red and one white.
- Align the wheels correctly using the guide marks / white lines.
- Go to the bottom of the Cross puzzle to find the red coded letters.
- Only decode the fully capitalized words.
- Decode those letters using the cipher wheel.
- Use the red wheel as the coded letter and the white wheel as the decoded letter.
- Read the decoded instruction.
- Use the carrying case base to find the clock time referenced by the decoded instruction.
- Use the verses from the Fish puzzle to find the Romans verse that matches that clock time.
- The correct verse is Romans 6:23.
- Read Romans 6:23 and identify the correct five-letter solution word.
- The correct answer is WAGES.
- Enter WAGES into the Heart puzzle to open it.
Final Answer:
WAGES
What Opens / What You Get:
When the Heart puzzle opens, it gives you a black light.
Reset This Puzzle
Text Reset Instructions
Goal:
Reset the Heart puzzle so it is locked and ready for the next group.
Materials:
- Outer red cylinder with the heart symbol
- Inner red cylinder
- Black light
Steps:
- Gather the outer red cylinder with the heart symbol, the inner red cylinder, and the black light.
- Place the black light into the inner cylinder with the handle going down and the lens facing up. It should sit flush with the top when properly inserted.
- Ensure the outer cylinder is set to the correct code, with all letters aligned properly.
- Hold the inner cylinder with the teeth and indicator dot facing upward, then insert it into the outer cylinder.
- Make sure the teeth align with the correct letters. The inner cylinder should slide in smoothly. If it does not, verify that each letter is exactly aligned with the indicator dot.
- Once fully seated, turn the letters to scramble the word and secure the puzzle.
Reset Video
 puzzle has been solved.
Need a Hint?
Start with Clue 1 and only move forward if needed.
Clue 1
Look to the frame in the wall, it will guide you.
Clue 2
Use the magnifying glass on readable text to discover the best focus.
079315
See Step-by-Step Instructions
Quick Explanation
Use the magnifying glasses from the Bible puzzle to examine the letters in JESUS. Look closely at the top of each letter to find the numbers J=0, E=7, S=9, U=3&1, S=5. The final answer is 079315.
Full Step-by-Step Walkthrough
Puzzle Goal:
Find the correct 6-digit combination for the Dove puzzle.
What You Need:
- The Dove puzzle
- The magnifying glasses from the Bible puzzle
- The back wall of the carrying case
Where to Look:
- Look at the letters in JESUS on the back wall of the carrying case.
What to Look For:
- Use the magnifying glasses to closely examine the top of each letter in JESUS.
How to Interpret It:
- Each letter reveals a number at the top. Read the numbers from left to right.
Step-by-Step Solve Instructions:
- Gather the Dove puzzle, the magnifying glasses from the Bible puzzle, and the back wall of the carrying case.
- Use the magnifying glasses to examine the letters in JESUS.
- Look closely at the top of each letter and identify the hidden numbers.
- Read the numbers from left to right: J=0, E=7, S=9, U=3&1, S=5.
- Enter the numbers into the puzzle from left to right.
- Align each number with the indicator arrows.
- Once the correct combination is entered, the puzzle will release.
Final Answer:
079315
What Opens / What You Get:
The Dove puzzle releases and is ready for the next step.
Reset This Puzzle
Text Reset Instructions
Goal:
Reset the Dove puzzle so the number pads are seated correctly and the lid locks securely.
Materials Needed:
- Four number pads
- Red box
- Dove lid with the 6-number combination
Steps:
-
Gather the pieces.
Gather the four number pads, the red box, and the Dove lid with the 6-number combination. -
Insert the number pads.
Place all four number pads into the box with the notch on each pad facing upward. The pads may face forward or backward, but all notches must point up. -
Check pad alignment.
Ensure the pads sit evenly and rest just slightly above the top of the box. If any notch is not facing up, the pads will sit too high and the lid will not fit properly. -
Face combination slot opening toward you and align lid.
Position the box so the combination slot opening is facing toward you. Ensure the lid arrows are also facing toward you, matching the orientation. -
Set the correct combination and place the lid.
Align the indicator arrows with the correct numbers, then place the lid onto the box. It should sit down easily. If it does not, recheck the pad alignment and combination. -
Lock the puzzle.
Turn the combination wheels to scramble the code and secure the lid in place. Ensure the lid is fully seated and the wheels turn smoothly.
Reset Video
 puzzle has been solved.
Hints
Start with Clue 1 and only move forward if needed.
Clue 1
You’ve opened the
.
Look at the smaller cylinder. Which words catch your eye?
Clue 2
Psalm 103:12 speaks of East to West. Let the compass soak up light. The longer the better.
571
See Step-by-Step Instructions
Quick Explanation
Use the black light to reveal hidden numbers on the compass, then read them from East to West based on the clue from the inner cylinder. The numbers are 571.
Full Step-by-Step Walkthrough
Puzzle Goal:
Determine the correct 3-digit combination to unlock the Tomb puzzle.
What You Need:
- Compass
- Inner cylinder from the Heart puzzle
- Black light
- Tomb puzzle
Where to Look:
- The verse printed on the inner cylinder
- The surface of the compass under black light
What to Look For:
- The phrase “East to West” emphasized in the verse
- Hidden glowing numbers on the compass
How to Interpret It:
- The phrase “East to West” tells you the direction to read the numbers
- The black light reveals the correct digits needed for the code
Step-by-Step Solve Instructions:
- Gather the compass, inner cylinder, black light, and Tomb puzzle.
- Read the verse on the inner cylinder and identify the phrase “East to West.”
- Turn off the lights or move to a darker setting.
- Use the black light to reveal hidden numbers on the compass.
- Read the glowing numbers from East to West.
- Enter the numbers left to right, aligning them with the indicator arrows on the Tomb puzzle.
Final Answer:
571
What Opens / What You Get:
The Tomb puzzle unlocks and opens for the next step in the game.
Reset This Puzzle
Text Reset Instructions
Goal:
Reset the Tomb puzzle so the FAITH viewing card is back inside the box and the lid is locked in place.
Materials:
- Tomb box
- FAITH viewing card
- Tomb lid with the 3-number combination
Reset Steps:
- Gather the tomb box, the FAITH viewing card, and the tomb lid with the 3-number combination.
- Insert the viewing card lengthwise into the box so the long edge goes in first. It should sit mostly inside the box and rest just slightly above the top when fully inserted.
- Make sure the lid is set to the correct combination, with the indicator arrows pointing to the correct numbers.
- Position the box so the combination slot opening on the top is facing toward you.
- Hold the lid so the indicator arrows are facing toward you, matching the orientation of the box.
- Set the lid onto the box. It should sit down easily. If it does not, recheck the combination and alignment.
- Turn the combination wheels to scramble the code and secure the lid in place. Ensure the lid is fully seated and the wheels turn smoothly. If the wheels do not turn easily, remove the lid and repeat the alignment steps.
Reset Video
 and
puzzles have been solved.
and
puzzles have been solved.
Hints
Start with Clue 1 and only move forward if needed.
Clue 1
On the box with two lids, do any words in the verse stand out?
Clue 2
Each white number pad shows half a word. How could it be completed?
347
See Step-by-Step Instructions
Quick Explanation
Use the number pads from the Dove puzzle and the Faith viewing card from the Tomb puzzle. Align the pads and place the card over them to complete the word GRACE. Then look through the section marked “FAITH” to reveal the hidden numbers. The final answer is 347.
Full Step-by-Step Walkthrough
Puzzle Goal:
Reveal the hidden 3-digit code using the verse and puzzle components.
What You Need:
- Four number pads from the Dove puzzle
- Faith viewing card from the Tomb puzzle
- Shared box with the verse
- Praying Hands lock
- Red box with the white lid
Where to Look:
- On the verse printed on the shared box
- On the number pads
- Through the Faith viewing card
What to Look For:
- Emphasized words: “by grace” and “through faith”
- Half-words on the number pads and the other half on the Faith card
How to Interpret It:
- The pads combine to form a large number pad
- The viewing card completes the words on the pads and the reveals hidden numbers
- “By grace” guides alignment
- Through "FAITH” reveals the code
Step-by-Step Solve Instructions:
- Gather the four number pads from the Dove puzzle.
- Align them so flat edges touch and corners face outward.
- Identify “by grace” and “through faith” in the verse.
- Place the Faith card to complete GRACE.
- Look through through "FAITH”
- Read the numbers: 3, 4, 7.
- Enter into the lock top to bottom.
- Open the lock, remove knob, insert into lid, turn to unlock.
Final Answer:
347
What Opens / What You Get:
The red box with the white lid opens, completing the Game.
Reset This Puzzle
Text Reset Instructions
Reset Goal:
Return the Praying Hands puzzle to its original locked and ready state for the next player.
What You Need:
- Praying Hands padlock
- Red “You Escaped” box
- Lid
- Knob
Step-by-Step Reset Instructions:
- Gather the pieces.
Gather the Praying Hands padlock, the red “You Escaped” box, the lid, and the knob. - Add the box contents.
Place a small gift, note of encouragement, or both inside the box. This step is optional, but highly recommended. If needed, you may reuse the original note. - Place the lid on the box.
Set the lid onto the red box. - Lock the lid.
Turn the knob clockwise until the box locks. - Remove the knob from the lid.
Once the box is locked, lift the knob straight up to remove it. - Attach the knob to the padlock shackle.
Slide the knob onto the Praying Hands padlock shackle, aligning the grooves on the knob with the grooves on the shackle. - Position the shackle over the lock body.
Move the shackle and knob into place over the padlock body. - Secure the lock.
Push the shackle straight down until it is fully seated in the lock body. - Check the lock.
Spin the dial to confirm the lock is properly reset. If the dial does not spin, press the shackle down again until it is fully seated.